 From Spiral04 To Spiral05
The code for the Model Concepts project is at model_concepts on GitHub.
The code for the Magic Boxes project is at mb_spirals on GitHub. For teaching or learning purposes, each spiral in Magic Boxes is decomposed into several sub-spirals.
In Spiral 04, each box has a title with the sequential number and (x, y) coordinates, and the same four items. In Spiral 05, boxes have the same appearance, but there is a tool bar that provides a new way of creating, selecting and moving boxes.
First changes are small but many, in order to standardize the code.
An HTML document loaded into a Web browser becomes a document object. The document object provides access to all HTML elements in the page. The document object is a part of the window object and can also be reached through the window.document property.
The querySelector method of the document object is used to find the canvas element within the document and attach events directly to the canvas object.
Code 04-05.01: Canvas events in the Board class.
Board(CanvasElement canvas) {
    …
    // Canvas event
    document.querySelector('#canvas').onMouseDown.listen(onMouseDown);
    // Redraw every INTERVAL ms.
    new Timer.periodic(const Duration(milliseconds: INTERVAL), (t) => redraw());
  }
A click (a mouse down event in the Board class) outside the canvas (or the board) on the Web page does not cause any events.
Code 04-05.02: Canvas events in the Box class.
Box(this.board, this.x, this.y, this.width, this.height) {
    …
    // Box events (actually, canvas events).
    document.querySelector('#canvas').onMouseDown.listen(onMouseDown);
    document.querySelector('#canvas').onMouseUp.listen(onMouseUp);
    document.querySelector('#canvas').onMouseMove.listen(onMouseMove);
  }
The Box class has now two constants that determine the box size.
Code 04-05.03: Box size constants.
class Box {

  static const int DEFAULT_WIDTH = 100;
  static final int DEFAULT_HEIGHT = 100;
The constants are used in the onMouseDown method of the Board class.
Code 04-05.04: Changes in the onMouseDown method of the Board class.
// Create a box in the position of the mouse click on the board,
  // but not on an existing box.
  void onMouseDown(MouseEvent e) {
    bool clickedOnBox = false;
    for (Box box in boxes) {
      if (box.contains(e.offset.x, e.offset.y)) {
        clickedOnBox = true;
        break;
      }
    }
    if (!clickedOnBox) {
      Box box = new Box(this, e.offset.x, e.offset.y,
        Box.DEFAULT_WIDTH, Box.DEFAULT_HEIGHT);
      if (e.offset.x + box.width > width) {
        box.x = width - box.width - 1;
      }
      if (e.offset.y + box.height > height) {
        box.y = height - box.height - 1;
      }
      boxes.add(box);
    }
  }
A new box creation is moved to the if statement that allows for the construction of a box only if a mouse down event happens on an empty space of the board. The name of the clickedOnExistingBox is shortened to clickedOnBox without the loss of any signification. The name of the event parameter becomes e, to make the length of arguments in the Box constructor more reasonable. The if statements use now the curly brackets even if there is only one statement in their bodies. This will avoid potential problems in future when if bodies become more complex and the use of curly brackets become oversight.
Code 04-05.05: if () {}.
int countSelectedBoxesContain(int pointX, int pointY) {
    int count = 0;
    for (Box box in boxes) {
      if (box.isSelected() && box.contains(pointX, pointY)) {
        count++;
      }
    }
    return count;
  }
The name of the countSelectedBoxesThatContain method is shorter for the “That” word.
The boolean attributes in the Box class are initialized to false to be, for comprehension purposes, explicit with initial values of attributes.
Code 04-05.06: Explicit initialization.
bool _selected = false;
  bool _mouseDown = false;
Several methods in the Box class are updated to follow decisions made in this spiral.
Code 04-05.07: New forms of methods in the Box class.
bool contains(int pointX, int pointY) {
    if ((pointX > x && pointX < x + width)
        && (pointY > y && pointY < y + height)) {
      return true;
    }
    else {
      return false;
    }
  }

  void onMouseDown(MouseEvent e) {
    _mouseDown = true;
    if (contains(e.offset.x, e.offset.y)) {
      toggleSelection();
    }
  }

  void onMouseUp(MouseEvent e) {
    _mouseDown = false;
  }

  // Change a position of the box with mouse mouvements.
  void onMouseMove(MouseEvent e) {
    if (contains(e.offset.x, e.offset.y) && isSelected() && _mouseDown &&
        board.countSelectedBoxesContain(e.offset.x, e.offset.y) < 2) {
      x =  e.offset.x - width / 2;
      if (x < 0) {
        x = 1;
      }
      if (x > board.width - width) {
        x = board.width - width - 1;
      }
      y = e.offset.y - height / 2;
      if (y < 0) {
        y = 1;
      }
      if (y > board.height - height) {
        y = board.height - height - 1;
      }
    }
  }
With a tool bar, which provides a new way to create and select boxes, MagicBoxes start to look as a tool (Figure 04-05.01).
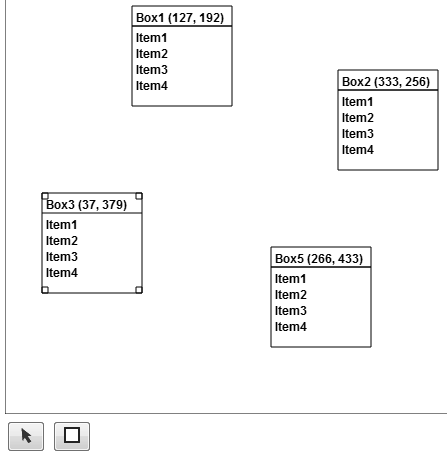
Figure 04-05.01: Simple tool bar.
A tool bar has two buttons, an arrow button for selection and a box button for creation. The selection button is on by default. Thus, in order to create a box, the creation button must be clicked on first. By clicking on an empty space of the board, a new box appears in that position, and the selection tool is on again. In order to create several boxes, the box tool must be double-clicked to stay active. To return to the select mode, the arrow button must be double-clicked.
There is a new class to represent the tool bar concept. The class is appropriately named ToolBar.
Code 04-05.08: The ToolBar class.
class ToolBar {

  static const int SELECT = 1;
  static const int BOX = 2;

  final Board board;

  int _onTool = SELECT;
  bool _boxToolDblClicked = false;
  …
}
The ToolBar class has two constants to represent two different states: SELECT and BOX. The class has a parent attribute to provide the reference to the context where the tool bar is created, which is the board. There are also two private attributes to indicate which tool is currently on and if the box tool is double-clicked.
In the constructor of the ToolBar class, the parent argument is accepted by the board parameter, which is immediately assigned to the board attribute of the class.
Code 04-05.09: The constructor of the ToolBar class.
ToolBar(this.board) {
    ButtonElement selectButton = document.querySelector('#select');
    ButtonElement boxButton = document.querySelector('#box');

    // Tool bar events.
    selectButton.onClick.listen((MouseEvent e) {
      _onTool = SELECT;
    });
    selectButton.onDoubleClick.listen((MouseEvent e) {
      _onTool = SELECT;
      _boxToolDblClicked = false;
    });
    boxButton.onClick.listen((MouseEvent e) {
      _onTool = BOX;
    });
    boxButton.onDoubleClick.listen((MouseEvent e) {
      _onTool = BOX;
      _boxToolDblClicked = true;
    });
  }
Two buttons of the ButtonElement type are obtained by the querySelector method on the document object. The two buttons are identified by their ids that come from the mb.html file (Code 04-05.10). The two png images are located in the img folder of the mb project.
Each button will listen for the click and double-click (dblClick) events. In the case of the click event, the _onTool attribute of the class accepts the corresponding state constant. When the double-click event happens, the _onTool attribute accepts the corresponding state constant and the _boxToolDblClicked attributes becomes true for the BOX state and false for the SELECT state.
Code 04-05.10: Two button elements in the mb.html file.
<section>
      <canvas id="canvas" width="800" height="600">
        Canvas is not supported in your browser.
      </canvas>
      <footer>
        <button id="select"><img src="img/select.png"/></button>
        <button id="box"><img src="img/box.png"/></button>
      </footer>
      <script type="application/dart" src="mb.dart"></script>
      <script src="packages/browser/dart.js"></script>
    </section>
Up to now, reactions of events have been defined in methods with appropriate names. For example, a click on the canvas of the board is handled in the onMouseDown method of the Board class. In the ToolBar class, events are registered and responses to them are defined at the same time in functions without names (anonymous functions).
Code 04-05.11: An anonymous function with the event parameter and the statement body.
selectButton.onClick.listen((MouseEvent e) {
      _onTool = SELECT;
    });
The toolbar attribute of the Board class is created in the constructor of the Board class.
Code 04-05.12: Tool bar creation.
ToolBar toolBar;

  Board(CanvasElement canvas) {
    …
    toolBar = new ToolBar(this);
    …
  }
In the on mouse down event of the Board class, several methods of the ToolBar class are used on the toolBar attribute.
Code 04-05.13: Box selection and creation on the board.
void onMouseDown(MouseEvent e) {
    bool clickedOnBox = false;
    for (Box box in boxes) {
      if (box.contains(e.offset.x, e.offset.y)) {
        clickedOnBox = true;
        break;
      }
    }

    if (toolBar.isSelectToolOn()) {
      if (!clickedOnBox) {
        deselectBoxes();
      }
    } else if (toolBar.isBoxToolOn()) {
      if (!clickedOnBox) {
        Box box = new Box(this, e.offset.x, e.offset.y,
          Box.DEFAULT_WIDTH, Box.DEFAULT_HEIGHT);
        if (e.offset.x + box.width > width) {
          box.x = width - box.width - 1;
        }
        if (e.offset.y + box.height > height) {
          box.y = height - box.height - 1;
        }
        boxes.add(box);
        toolBar.selectToolOn();
      }
    }
  }
If the selection tool is on, a box cannot be created. However, a box can be selected by clicking on it (or deselected if it is already selected). If there are selected boxes (one or more), all selected boxes are deselected by clicking on an empty space of the board. This is done by the deselectBoxes method of the Board class (Code 04-05.14).
If the box tool is on, a new box is created by clicking on an empty space of the board. After the box creation, the select(ion) tool is activated. If the box tool is on and a box is clicked on, test what happens and comment if that is desirable behavior.
Double-click on a tool bar tool keeps the tool on.
Code 04-05.14: Deselecting boxes.
void deselectBoxes() {
    for (Box box in boxes) {
      box.deselect();
    }
  }
The methods of the ToolBar class that start with is return a boolean value. They check what tool is on and return true if that tool is active. The selectToolOn method activates the select tool, but only if the box tool has not been double-clicked.
Code 04-05.15: Tool bar methods.
bool isSelectToolOn() {
    if (_onTool == SELECT) {
      return true;
    }
    return false;
  }

  bool isBoxToolOn() {
    if (_onTool == BOX) {
      return true;
    }
    return false;
  }

  void selectToolOn()  {
    if (!_boxToolDblClicked) {
      _onTool = SELECT;
    }
  }
There are three methods in the Board class that are not used in this spiral. All three methods handle a collection of boxes. Many boxes may be created, selected and deleted by these methods. Find a way to use (test) them.
Code 04-05.16: Unused methods of the Board class.
void createBoxes(int n) {
    int x = 0; int y = 0;
    for (int i = 0; i < n; i++) {
      boxes.add(new Box(this, x, y, Box.DEFAULT_WIDTH, Box.DEFAULT_HEIGHT));
      x = x + Box.DEFAULT_WIDTH;
      y = y + Box.DEFAULT_HEIGHT;
    }
  }

  void deleteBoxes() {
    boxes.clear();
  }

  void selectBoxes() {
    for (Box box in boxes) {
      box.select();
    }
  }
The last changes in this spiral are related to the Web page presentation defined by Cascading Styles Sheets (Figure 04-05.02). While HTML provides the content, the CSS defines the presentation style of that content.
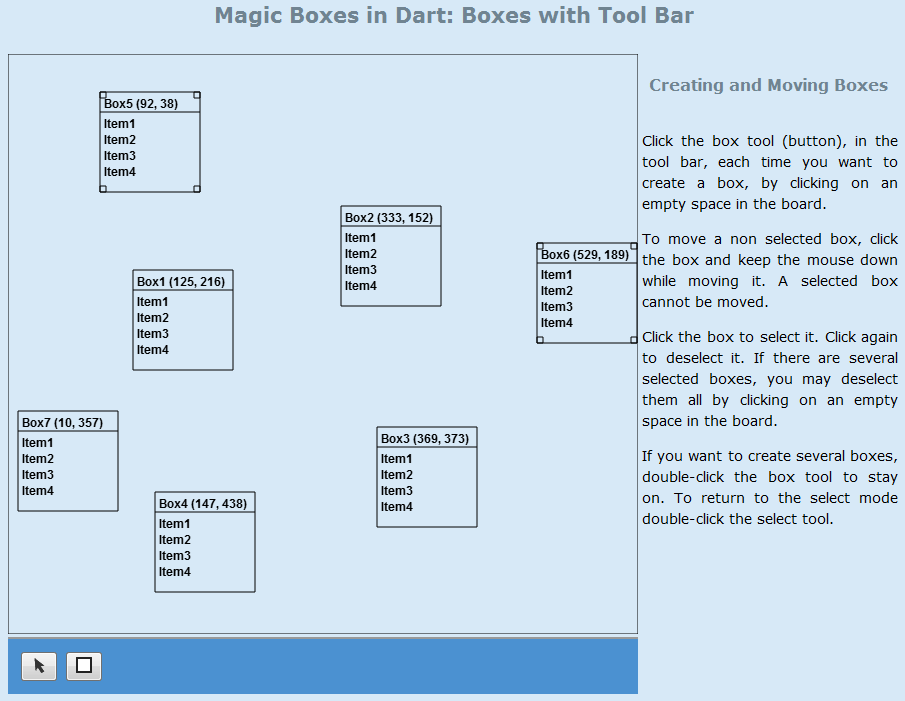
Figure 04-05.02: CSS presentation of the page.
The mb.html file has links to CSS definitions in different files that are located in the css sub-folder of the project.
Code 04-05.17: CSS links.
<head>
    <meta charset="utf-8"/>
    <meta name="author" content="Dzenan Ridjanovic"/>
    <title>mb</title>
    <link rel="stylesheet" href="css/layout.css"/>
    <link rel="stylesheet" href="css/layout2c.css"/>
    <link rel="stylesheet" href="css/link.css"/>
    <link rel="stylesheet" href="css/page.css"/>
  </head>
There are 2 sections in the page: the main section with the board and tool bar (Code 04-05.18), and the right section with text only (Code 04-05.19). The canvas size is reduced from 800x600 to 630x580 pixels to accommodate the new section to the right of the main section.
Code 04-05.18: The main section of the page.
<section id="main">
      <canvas id="canvas" width="630" height="580">
        Canvas is not supported in your browser.
      </canvas>
      <footer>
        <button id="select"><img src="img/select.png"/></button>
        <button id="box"><img src="img/box.png"/></button>
      </footer>
      <script type="text/javascript" src="mb.dart.app.js"></script>
    </section>
The page has a title, and the right section has a sub-title.
Code 04-05.19: The right section of the page.
<section id="right">
      <header>
        <h3>Creating and Moving Boxes</h3>
      </header>
      <p>
        Click the box tool (button), in the tool bar, each time you
        want to create a box, by clicking on an empty space in the
        board.
      </p>
      <p>
        To move a non selected box, click the box and keep the mouse
        down while moving it.
        A selected box cannot be moved.
      </p>
      <p>
        Click the box to select it. Click again to deselect it.
        If there are several selected boxes, you may deselect them all
        by clicking on an empty space in the board.
      </p>
      <p>
        If you want to create several boxes, double-click the box tool
        to stay on.
        To return to the select mode double-click the select tool.
      </p>
    </section>
The basic layout of the page is defined in the layout.css file (Code 04-05.20), while the layout with two columns is detailed in the layout2c.css file (Code 04-05.21).
While HTML has elements with opening and closing tags, CSS has selectors with properties in curly brackets. A property has a value that is separated from its name by two columns. The property value is ended by a semi-column.
CSS selectors that are named as HTML elements, provide property definitions of those elements. Thus, the presentation of a header element used in the page is defined by property values of the header selector in the style sheet. The names of CSS properties are almost self-explanatory; for details see dochub/CSS. The CSS definitions used in the MagicBoxes project are influenced by SimpleBits. The comments used before and after CSS selectors should be self-evident.
Code 04-05.20: The basic layout of the page.
/* layout.css */

/* ===[ begin ]=== */

/*
  Title:                   Basic Layout Design Style
  Author:                  Dzenan Ridjanovic
  Influenced By:           http://www.simplebits.com/
  Created:                 2006-09-03
  Updated:                 2011-12-08
*/

  header {
    color: #708491;
    padding: 6px;
    background: #d7e9f7;
    text-align: center;
  }

  footer {
    clear: both;
    font-family: arial, sans-serif;
    font-size: 12px;
    font-weight: bold;
    color: #fffff0;
    background: #4b91d1;
    padding: 10px;
    border-top: 2px solid #999999;
  }

/* ===[ end ]=== */
User defined and named selectors that start with the hash character are called identifiers (id selectors). They are referred in HTML elements by id attributes.
Code 04-05.21: Identifier.
#main {
    float: left;
    width: 70%;
  }
The main selector is used in the web page as the id attribute of the first section.
Code 04-05.22: The main section.
<section id="main">
      …
    </section>
The float property of the main selector positions the first section on the left of the page, while the width property reserves the 70% of the page. The next section that has the id attribute with the right value flows to the right of the first section. However, there is no right selector in the css files of this spiral, because there was no need to be more precise with the presentation style of the right section. As a consequence, the second section is displayed in the same way even without the id attribute.
CSS selectors from the link.css file are not used currently, because there is no a tag in the page.
How the page body, sections and paragraphs are presented is defined in the page.css file.
Code 04-05.23: The basic page element selectors.
body {
    font-family: verdana, arial, helvetica, sans-serif;
    font-size: 14px;
    background: #d7e9f7;
    width:900px;
    margin-left: 100px;
    margin-right: 100px;
    padding:10px;
  }

  section {
    padding: 4px;
  }

  p {
    line-height: 1.5em;
    text-align: justify;
    margin-left: 2px;
    margin-right: 2px;
  }