 From Spiral07 To Spiral08
The code for the Model Concepts project is at model_concepts on GitHub.
The code for the Magic Boxes project is at mb_spirals on GitHub. For teaching or learning purposes, each spiral in Magic Boxes is decomposed into several sub-spirals.
In Spiral 07, a line may be selected and deleted.
In Spiral 08, for the last selected box, its title may be changed and an item may be added.
The tool bar has two input elements (fields), one for a box title (name) and the other for entering box items (Figure 07-08.01). A box may be seen as a concept (an entity) in modeling. Consequently, a box item may be considered as an attribute of the concept. In addition, an item may be declared as the globally unique identifier (guid), which has a universally unique value such as a time stamp. An item may be the identifier of its concept, or a part of the identifier (significant to a user). Finally, an item may be required (its value is required).

Figure 07-08.01: A simple model with concepts, attributes and a relationship.
A line between two boxes, may be considered as a relationship between two concepts. Thus, in Figure 07-08.01, a simple model has two concepts and one relationship. The Project and Task concepts have both three attributes. The project identifier is number (italics and bold). The objective attribute is required (bold). The description attribute is optional. A project may have from 0 to N (many) tasks. A task must belong to a project.
For the last selected box, its title may be changed by entering text in the Box field. For the last selected box, an item may be added by entering its name in the Item box, then clicking on the Add button. The choice of item categories is presented in the pop-up list. An existing item may be obtained by entering its name and clicking on the Get button. The obtained item may be changed (Set button) or even removed (Remove button).
Since there is no box number any more, the nextBoxNo property is removed from the Board class.
Code 07-08.01: The nextBoxNo property is removed from the Board class.
int get nextBoxNo() => boxes.length + 1;The Board class has the lastBoxSelected attribute that will be used to change the box name and to add items.
Code 07-08.02: The lastBoxSelected attribute.
class Board {
  …
  Box lastBoxSelected;
The printBoxNames method may be used in testing.
Code 07-08.03: The printBoxNames method of the Board class.
void printBoxNames() {
    for (Box box in boxes) {
      print(box.title);
    }
  }
When a new box is constructed, its name is Box (without the box number and the position coordinates).
Code 07-08.04: The private name attribute.
class Box {
  …
  String _name = 'Box';
There are no predefined items.
Code 07-08.05: The draw method of the Box class.
void draw() {
    if (!isHidden()) {
      board.context.beginPath();
      …
      board.context.fillText(title, x + TOS, y + TOS, width - TOS);
      if (isSelected()) {
        board.context.rect(x, y, SSS, SSS);
        board.context.rect(x + width - SSS, y, SSS, SSS);
        board.context.rect(x + width - SSS, y + height - SSS, SSS, SSS);
        board.context.rect(x, y + height - SSS, SSS, SSS);
      }
      board.context.lineWidth = defaultLineWidth;
      board.context.closePath();
      board.context.stroke();
    }
  }
Note that in the fillText method of the draw method, the title property is used instead of the private name attribute. The property name is title. There are two methods for handling the property. The method with the set keyword is used to update the private name attribute. The method with the get keyword is used to rea the property. Since the property uses the private attribute, it is not virtual.
Code 07-08.06: The title property of the Box class.
void set title(String name) {
    _name = name;
  }

  String get title() {
    return _name;
  }
The select, deselect and toggleSelection methods of the Box class keep the lastBoxSelected attribute of the Board class up to date.
Code 07-08.07: Handling of the last box selected.
void select() {
    _selected = true;
    board.lastBoxSelected = this;
  }

  void deselect() {
    _selected = false;
    board.lastBoxSelected = null;
  }

  void toggleSelection() {
    _selected = !_selected;
    if (_selected) {
      board.lastBoxSelected = this;
    } else {
      board.lastBoxSelected = null;
    }
  }
The toString method stays in the Box class, but without the use of the box number. The method is not used in the drawing of a box.
Code 07-08.08: No more box number.
String toString() => '$title ($x, $y)';The ToolBar class has a new attribute of the InputElement type. This attribute, with the boxNameInput name, will be presented as a field in the tool bar.
Code 07-08.09: The boxNameInput attribute.
class ToolBar {
  …
  InputElement boxNameInput;
In the constructor of the ToolBar class, the boxNameInput attribute references the boxName element of the document. The two anonymous event functions are used to react to events of the input field. When the input element gets focus, its value becomes the title of the last selected box. When a user inputs a new box name, the title of the last box selected becomes the value of the input.
Code 07-08.10: Two events to handle the box title display and update.
ToolBar(this.board) {
    …
    boxNameInput = document.querySelector('#boxName');
    boxNameInput.onFocus.listen((Event e) {
      Box box = board.lastBoxSelected;
      if (box != null) {
        boxNameInput.value = box.title;
      }
    });
    boxNameInput.onInput.listen((Event e) {
      Box box = board.lastBoxSelected;
      if (box != null) {
        box.title = boxNameInput.value;
      }
    });
  }
The Web page is updated to add a label element with the Box display, and an input element of the text type with the boxName id. This id is referenced by the label (for) and used in programming to make a connection between the input element and the boxNameInput attribute of the InputElement type in the ToolBar class.
Code 07-08.11: The box name label and input field.
<section>
<canvas id="canvas" width="890" height="560">
Canvas is not supported in your browser.
</canvas>
<footer>
<button id="select"><img src="img/select.png"/></button>
<button id="box"><img src="img/box.png"/></button>
<button id="line"><img src="img/line.png"/></button>
<label for="boxName">Box</label>
<input type="text" id="boxName"/>
</footer>
<script type="application/dart" src="mb.dart"></script>
<script src="packages/browser/dart.js"></script>
</section>Two boxes with one line are created in Figure 07-08.02. Inittially, both boxes have the Box name. The first box is selected and its name is changed from Box to Project. Then, the second box is selected and its name is changed from Box to Task.
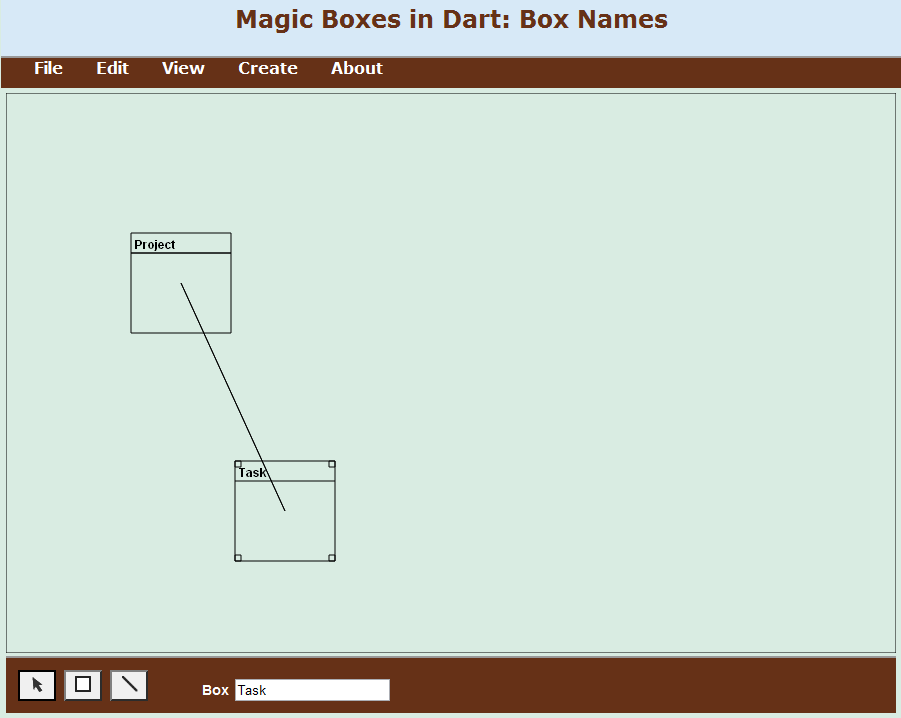
Figure 07-08.02: Boxes may have names.
The size of a box increased from 100 by 100 pixels to 120 by 120 pixels.
Code 07-08.12: The box size increase.
class Box {

  static const int DEFAULT_WIDTH = 120;
  static const int DEFAULT_HEIGHT = 120;
The box size is increased to accommodate user entered items (Figure 07-08.03).
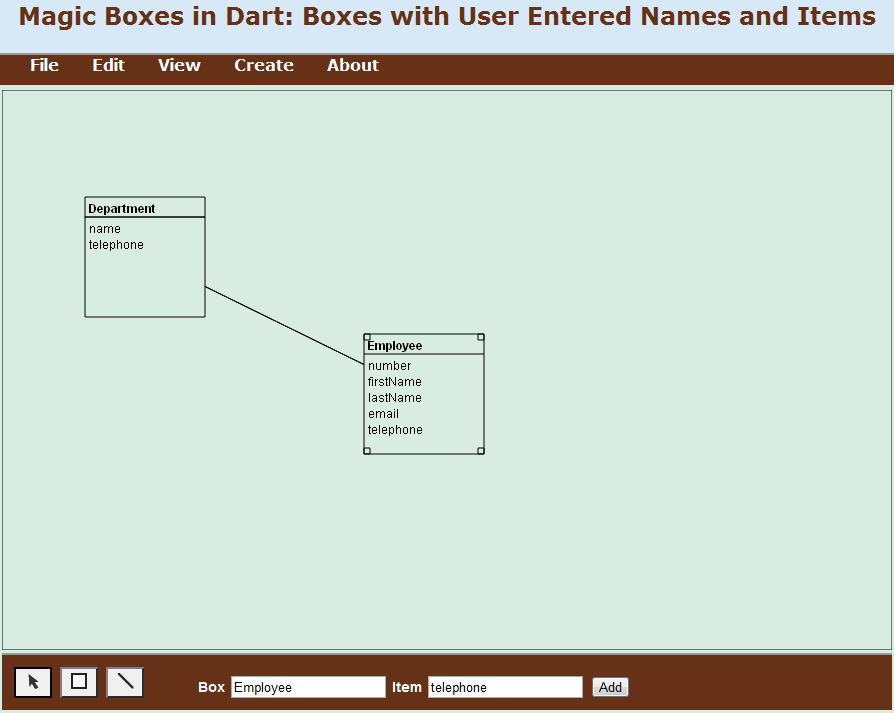
Figure 07-08.03: User entered item names.
For the last selected box, an item may be added by entering its name in the Item box, then clicking on the Add button. A box may be seen as a concept (an entity) in modeling. Consequently, a box item may be considered as an attribute of the concept. A line between two boxes, may be considered as a relationship between two concepts.
Note that a line is covered by its boxes. Two simple changes enabled this desirable feature. In the redraw method of the Board class, the sequence of drawing is changed. Boxes are drawn after all lines are drawn.
Code 07-08.13: Lines are drawn before boxes.
void redraw() {
    clear();
    for (Line line in lines) {
      line.draw();
    }
    for (Box box in boxes) {
      box.draw();
    }
  }
In the draw method of the Box class, before a box is drawn its rectangle is cleared, removing everything that has already been drawn within the box.
Code 07-08.14: Box rectangle is cleared first.
void draw() {
    if (!isHidden()) {
      board.context.beginPath();
      board.context.clearRect(x, y, width, height);
      …
      board.context.closePath();
      board.context.stroke();
    }
  }
The Box class has the items attribute of the List type.
Code 07-08.15: The items attribute.
class Box {
  …
  List<Item> items;
  …
  Box(this.board, this.x, this.y, this.width, this.height) {
    …
    items = new List();
    …
  }
A list of items can accept only objects of the new Item class.
Code 07-08.16: The Item class.
class Item {

  final Box box;

  String name;

  Item(this.box, String name) {
    this.name = name;
    box.items.add(this);
  }

}
The Item class has two attributes: box and name. The box attribute references the parent container of the current item. The name attribute is the item name and is of the String type. In the constructor of the Item class, the shortcut notation is used for the box parameter, while the regular notation is used for the name parameter. In this regular notation, the this keyword is used to make a distinction between the name attribute and the name parameter, because they have the same name. The shortcut notation should have been used also for the name parameter.
The current item, represented by this, is added to the items attribute of the box attribute, which references the item’s box.
Within a box, items that are members of the items attribute are drawn by the draw method of the Box class.
Code 07-08.17: Items are drawn within the for loop.
void draw() {
    if (!isHidden()) {
      board.context.beginPath();
      board.context.clearRect(x, y, width, height);
      …
      num i = 0;
      for (Item item in items) {
        board.context.font = '' + textFontSize + 'px sans-serif';
        board.context.fillText(item.name, x + TOS, y + TOS + TBH + i * IOS, width - TOS);
        i++;
      }
      …
      board.context.closePath();
      board.context.stroke();
    }
  }
The x and y coordinates of an item are determined by its sequential position within the box with the help of constants.
The item name input and the add item button elements are added as the new attributes of the ToolBar class immediately after the box name input element.
Code 07-08.18: Item input element.
class ToolBar {
  …
  InputElement boxNameInput;
  InputElement itemNameInput;
  ButtonElement addItemButton;
In the constructor of the ToolBar class, the querySelector method is used to find the corresponding elements in the document. The click event is linked to the add button. For the last selected box, the new item is constructed and a value entered by a user is selected in the Item field. The new item is linked to its box by its constructor.
Code 07-08.19: Adding a new item.
ToolBar(this.board) {
    …
    itemNameInput = document.querySelector('#itemName');

    addItemButton = document.querySelector('#addItem');
    addItemButton.onClick.listen((MouseEvent e) {
      Box box = board.lastBoxSelected;
      if (box != null) {
        new Item(box, itemNameInput.value);
        itemNameInput.select();
      }
    });
  }
In the mb.html file, three elements are added for a new item: a label with the Item text, an input with the itemName id used in the constructor of the ToolBar class, and a button with the addItem id.
Code 07-08.20: Label, input and button elements for an item.
<section>
      …
      <footer>
        …
        <label for="boxName">Box</label>
        <input type="text" id="boxName"/>
        <label for="itemName">Item</label>
        <input type="text" id="itemName"/>
        <button id="addItem">Add</button>
      </footer>
      …
    </section>
In the Box class, there are two new methods to find and remove an item.
Code 07-08.21: Find and remove item.
Item findItem(String name) {
    for (Item item in items) {
      if (item.name == name) {
        return item;
      }
    }
    return null;
  }

  bool removeItem(Item item) {
    if (item != null) {
      int index = items.indexOf(item, 0);
      if (index >= 0) {
        items.removeRange(index, 1);
        return true;
      }
    }
    return false;
  }
The ToolBar class has four new attributes.
Code 07-08.22: Get, set and remove item buttons and the current item.
class ToolBar {
  …
  ButtonElement getItemButton;
  ButtonElement setItemButton;
  ButtonElement removeItemButton;

  Item currentItem;
In the constructor of the ToolBar class, reactions to clicks on the get, set and remove buttons are defined.
Code 07-08.23: Get, set and remove item events.
ToolBar(this.board) {
    …
    getItemButton = document.querySelector('#getItem');
    getItemButton.onClick.listen((MouseEvent e) {
      Box box = board.lastBoxSelected;
      if (box != null) {
        Item item = box.findItem(itemNameInput.value);
        if (item != null) {
          currentItem = item;
          itemNameInput.value = item.name;
          itemNameInput.select();
        } else {
          currentItem = null;
        }
      }
    });

    setItemButton = document.querySelector('#setItem');
    setItemButton.onClick.listen((MouseEvent e) {
      Box box = board.lastBoxSelected;
      if (box != null) {
        if (currentItem != null) {
          currentItem.name = itemNameInput.value;
          itemNameInput.select();
        }
      }
    });

    removeItemButton = document.querySelector('#removeItem');
    removeItemButton.onClick.listen((MouseEvent e) {
      Box box = board.lastBoxSelected;
      if (box != null) {
        if (currentItem != null) {
          if (box.removeItem(currentItem)) {
            currentItem = null;
            itemNameInput.value = '';
          }
        }
      }
    });
  }
In the footer of the Web page, the button elements, with their ids used in the constructor of the ToolBar class, are added.
Code 07-08.24: Get, set and remove item buttons.
<section>
      …
      <footer>
        …
        <button id="getItem">Get</button>
        <button id="setItem">Set</button>
        <button id="removeItem">Remove</button>
      </footer>
      …
    </section>
An existing item may be obtained by entering its name and clicking on the Get button. The item name may be changed by the Set button or deleted by the Remove button (Figure 07-08.04).
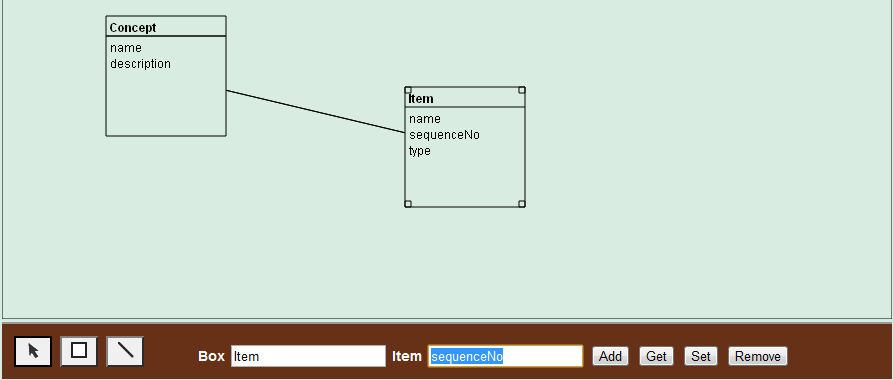
Figure 07-08.04: Updating an item name.
An item has a category.
Code 07-08.25: The item category.
class Item {

  final Box box;

  String name;
  String category;

  Item(this.box, this.name, this.category) {
    box.items.add(this);
  }

}
The item category is represented in the Web page (Figure 07-08.05) as a select element (pop-up list). By default, an item is an attribute. In addition, it may be declared as guid (globally unique identifier–not significant to a user), identifier (significant to a user) or required (mandatory value).
Code 07-08.26: The select element with the itemCategory id.
<section>
      …
      <footer>
        …
        <label for="boxName">Box</label>
        <input type="text" id="boxName"/>
        <label for="itemName">Item</label>
        <input type="text" id="itemName"/>
        <select id="itemCategory">
          <option>attribute</option>
          <option>guid</option>
          <option>identifier</option>
          <option>required</option>
        </select>
        <button id="addItem">Add</button>
        <button id="getItem">Get</button>
        <button id="setItem">Set</button>
        <button id="removeItem">Remove</button>
      </footer>
      …
    </section>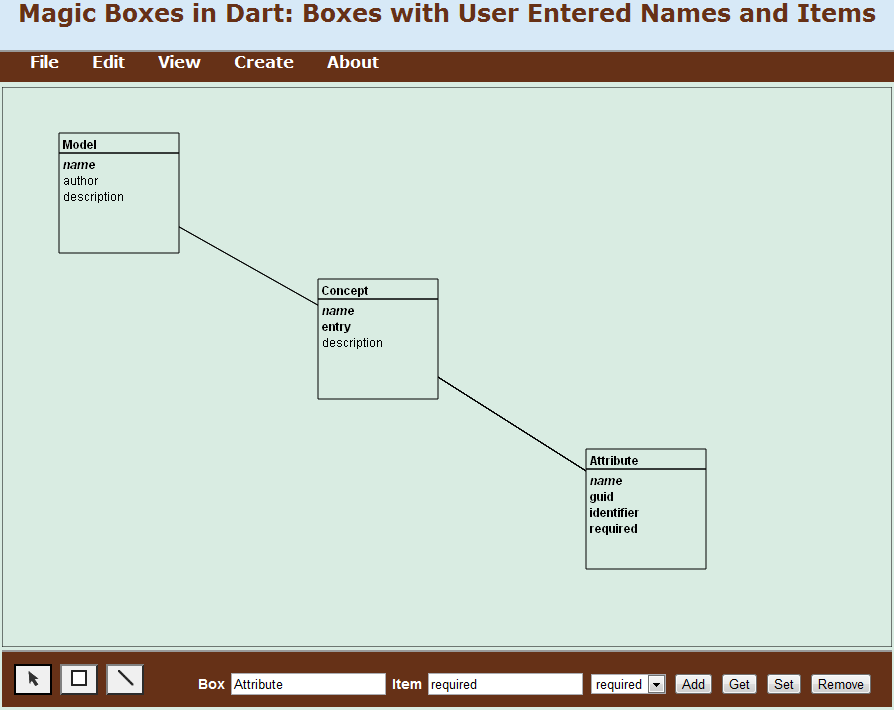
Figure 07-08.05: Selecting an item category.
The ToolBar class has the itemOption attribute of the SelectElement type.
Code 07-08.27: The item option (category).
class ToolBar {
  …
  InputElement boxNameInput;
  InputElement itemNameInput;
  SelectElement itemOption;
The itemOption attribute gets its value from the querySelector method of the document. After a click on the add button, the new item becomes the current item.
Code 07-08.28: The constructor of the ToolBar class.
ToolBar(this.board) {
    …
    itemOption = document.querySelector('#itemCategory');

    addItemButton = document.querySelector('#addItem');
    addItemButton.onClick.listen((MouseEvent e) {
      Box box = board.lastBoxSelected;
      if (box != null) {
        currentItem = new Item(box, itemNameInput.value, itemOption.value);
        itemNameInput.select();
      }
    });
    …
  }
Items are displayed differently based on their categories.
Code 07-08.29: An item display in the draw method of the Box class.
for (Item item in items) {
        if (item.category == 'attribute') {
          board.context.font = '${textFontSize}px sans-serif';
          board.context.fillText(item.name, x + TOS, y + TOS + TBH + i * IOS,
            width - TOS);
        } else if (item.category == 'guid') {
          board.context.font = 'italic ${textFontSize}px sans-serif';
          board.context.fillText(item.name, x + TOS, y + TOS + TBH + i * IOS,
            width - TOS);
        } else if (item.category == 'identifier') {
          board.context.font = 'bold italic ${textFontSize}px sans-serif';
          board.context.fillText(item.name, x + TOS, y + TOS + TBH + i * IOS,
            width - TOS);
        } else if (item.category == 'required') {
          board.context.font = 'bold ${textFontSize}px sans-serif';
          board.context.fillText(item.name, x + TOS, y + TOS + TBH + i * IOS,
            width - TOS);
        }
        i++;
      }
The Line class has new attributes for min and max cardinalities in both directions – from box1 to box2 and from box2 to box1.
Code 07-08.30: Line cardinalities.
class Line {

  final Board board;

  Box box1; // line begin box
  Box box2; // line end box

  String box1box2Min; // min cardinality from box1 to box2
  String box1box2Max; // max cardinality from box1 to box2

  String box2box1Min; // min cardinality from box2 to box1
  String box2box1Max; // max cardinality from box2 to box1

  bool _selected = false;
  bool _hidden = false;

  String textFontSize = 12;
  num defaultLineWidth = 1;
The cardinalities are initialized in the constructor of the Line class. The box1 parameter represents a parent and the box2 parameter a child. A parent has from 0 to N children, and a child has one and only one parent.
Code 07-08.31: The Line class constructor.
Line(this.board, this.box1, this.box2) {
    box1box2Min = '0';
    box1box2Max = 'N';
    box2box1Min = '1';
    box2box1Max = '1';
    draw();
    defaultLineWidth = board.context.lineWidth;
  }
The min..max cardinalities are displayed in the draw method of the Line class.
Code 07-08.32: The draw method of the Line class.
void draw() {
    if (!isHidden()) {
      board.context.beginPath();
      …
      board.context.font = '${textFontSize}px sans-serif';
      Point box1box2MinMaxPoint =
        calculateMinMaxPointCloseToBeginBox(box1, box2);
      Point box2box1MinMaxPoint =
        calculateMinMaxPointCloseToBeginBox(box2, box1);
      String box1box2MinMax = '${box1box2Min}..${box1box2Max}';
      String box2box1MinMax = '${box2box1Min}..${box2box1Max}';
      board.context.fillText(box1box2MinMax,
        box1box2MinMaxPoint.x, box1box2MinMaxPoint.y);
      board.context.fillText(box2box1MinMax,
        box2box1MinMaxPoint.x, box2box1MinMaxPoint.y);
      board.context.closePath();
      board.context.stroke();
    }
  }
The calculateMinMaxPointCloseToBeginBox method returns a point where the min..max cardinalities close to the first box given will be positioned. The point is calculated with the help of the getIntersectionPoint method of the Box class.
Code 07-08.33: The point where min and max cardinalities will be displayed.
Point calculateMinMaxPointCloseToBeginBox(Box beginBox, Box endBox) {
    num x = 0;
    num y = 0;

    Point lineBeginPoint = beginBox.center();
    Point lineEndPoint = endBox.center();
    Point beginPoint =
      beginBox.getIntersectionPoint(lineBeginPoint, lineEndPoint);
    Point endPoint =
      endBox.getIntersectionPoint(lineEndPoint, lineBeginPoint);

    num x1 = beginPoint.x;
    num y1 = beginPoint.y;
    num x2 = endPoint.x;
    num y2 = endPoint.y;

    if (x1 <= x2) {
      x = x1 + 1 * ((x2 - x1) / 8);
      if (y1 <= y2) {
        y = y1 + 1 * ((y2 - y1) / 8);
      } else {
        y = y2 + 7 * ((y1 - y2) / 8);
      }
    } else {
      x = x2 + 7 * ((x1 - x2) / 8);
      if (y1 <= y2) {
        y = y1 + 1 * ((y2 - y1) / 8);
      } else {
        y = y2 + 7 * ((y1 - y2) / 8);
      }
    }
    return new Point(x, y);
  }
Code 07-08.34: The getIntersectionPoint of the Box class.
Point getIntersectionPoint(Point lineBeginPoint, Point lineEndPoint) {
    num x1 = lineBeginPoint.x;
    num y1 = lineBeginPoint.y;
    num x2 = lineEndPoint.x;
    num y2 = lineEndPoint.y;
    if (x2 == x1) {
      /* vertical line */
      return new Point(x2, (y2 < y1 ? y : y + height));
    }
    if (y2 == y1) {
      /* horizontal line */
      return new Point((x2 < x1 ? x : x + width), y2);
    }

    double m = (y2 - y1) / (x2 - x1);
    num intersectionX = (x2 < x1 ? x : x + width);
    double fy = m * (intersectionX - x2) + y2;
    num intersectionY;
    /* float comparison, because fy may be bigger than the biggest integer */
    if (fy >= y && fy <= y + height) {
      intersectionY = fy.toInt();
    } else {
      y = (y2 < y1 ? y : y + height);
      x = ((fy - y2) ~/ m) + x2;
    }
    return new Point(intersectionX, intersectionY);
  }
A meta model is a model about models. A simple meta model, shown in Figure 07-08.06, representing models, model concepts and concept attributes is designed in the last step of Spiral 08.
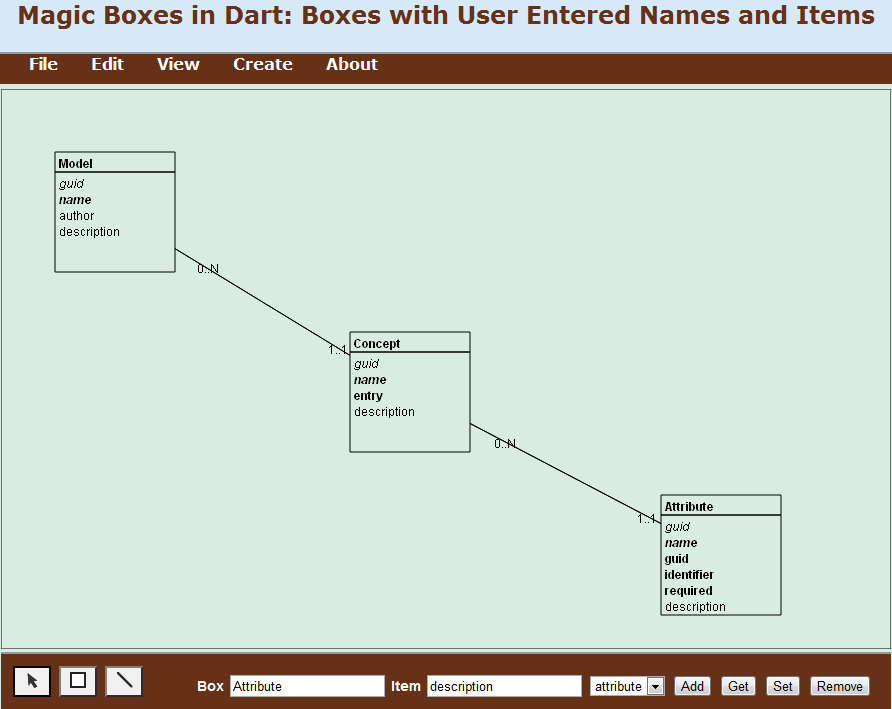
Figure 07-08.06: Cardinalities in a simple meta model.