 From Spiral08 To Spiral09
The code for the Model Concepts project is at model_concepts on GitHub.
The code for the Magic Boxes project is at mb_spirals on GitHub. For teaching or learning purposes, each spiral in Magic Boxes is decomposed into several sub-spirals.
In Spiral 08, for the last selected box, its title may be changed and an item may be added.
In Spiral 09, line min..max cardinalities may be changed by getting the selected line with a click on the Get button in the tool bar, making changes and setting them with a click on the Set button. Line direction names may be added. A line direction with 1..1 cardinalities may become a part of the identifier of the source concept.
Box sizes may be changed by using the View menu. There are menu items for increasing or decreasing the height, the width and the size of selected boxes.
Even a meta model, as one in Figure 08-09.01, may be designed with this spiral. The meta model represents what the MagicBoxes project tries to accomplish at the data level. Within a domain, there may be multiple models. A model may have several concepts. A concept consists of properties and neighbors. A concept may have several graphical representations (boxes), usually only one. A box may not be related to a concept (the minimum cardinality of zero from Box to Concept). The relationship direction from Concept to Box is named views. A property may have a type, which is a part of the parent domain.
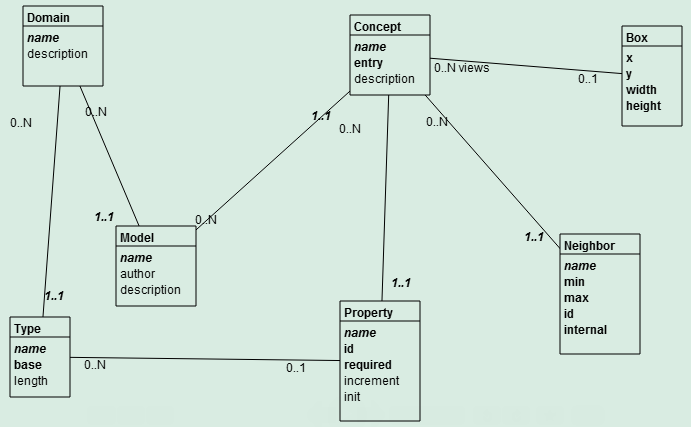
Figure 08-09.01: Meta model.
In a many-to-many relationship (Figure 08-09.02), between the Course and Student concepts, the third concept is introduced. The Enrollment concept breaks the many-to-many relationship into two one-to-many relationships with named directions. The (user oriented) identifier of the Enrollment concept consists of the two neighbor concepts. All these changes are done by selecting a relationship, getting it in the tool bar, making changes and then setting the relationship.
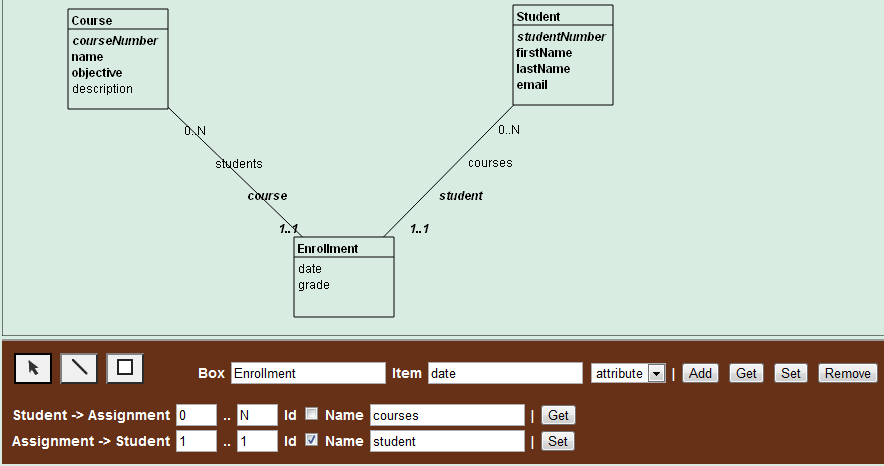
Figure 08-09.02: A many-to-many relationship.
The menu bar has six new button elements.
Code 08-09.01: View menu items.
class MenuBar {
  …
  // View
  ButtonElement increaseSelectionHeightButton;
  ButtonElement decreaseSelectionHeightButton;
  ButtonElement increaseSelectionWidthButton;
  ButtonElement decreaseSelectionWidthButton;
  ButtonElement increaseSelectionSizeButton;
  ButtonElement decreaseSelectionSizeButton;
In the constructor of the MenuBar class, the button elements are initialized by the querySelector method of the document representing the Web page. In addition, their click events are defined by anonymous functions. The reactions to clicks on the buttons are handled by methods in the Board class.
Code 08-09.02: Reactions to click events of the View menu items.
MenuBar(this.board) {
    …
    increaseSelectionHeightButton = document.querySelector('#increase-selection-height');
    decreaseSelectionHeightButton = document.querySelector('#decrease-selection-height');
    increaseSelectionWidthButton = document.querySelector('#increase-selection-width');
    decreaseSelectionWidthButton = document.querySelector('#decrease-selection-width');
    increaseSelectionSizeButton = document.querySelector('#increase-selection-size');
    decreaseSelectionSizeButton = document.querySelector('#decrease-selection-size');
    …
    // Menu bar events.
    …
    increaseSelectionHeightButton.onClick.listen((MouseEvent e) {
      board.increaseHeightOfSelectedBoxes();
    });
    decreaseSelectionHeightButton.onClick.listen((MouseEvent e) {
      board.decreaseHeightOfSelectedBoxes();
    });
    increaseSelectionWidthButton.onClick.listen((MouseEvent e) {
      board.increaseWidthOfSelectedBoxes();
    });
    decreaseSelectionWidthButton.onClick.listen((MouseEvent e) {
      board.decreaseWidthOfSelectedBoxes();
    });
    increaseSelectionSizeButton.onClick.listen((MouseEvent e) {
      board.increaseSizeOfSelectedBoxes();
    });
    decreaseSelectionSizeButton.onClick.listen((MouseEvent e) {
      board.decreaseSizeOfSelectedBoxes();
    });
    …
  }
Those methods change the size of selected boxes.
Code 08-09.03: Change size methods of the Board class.
void increaseHeightOfSelectedBoxes() {
    for (Box box in boxes) {
      if (box.isSelected()) {
        box.height = box.height + Box.DEFAULT_INCREMENT;
      }
    }
  }

  void decreaseHeightOfSelectedBoxes() {
    for (Box box in boxes) {
      if (box.isSelected()) {
        box.height = box.height - Box.DEFAULT_INCREMENT;
      }
    }
  }

  void increaseWidthOfSelectedBoxes() {
    for (Box box in boxes) {
      if (box.isSelected()) {
        box.width = box.width + Box.DEFAULT_INCREMENT;
      }
    }
  }

  void decreaseWidthOfSelectedBoxes() {
    for (Box box in boxes) {
      if (box.isSelected()) {
        box.width = box.width - Box.DEFAULT_INCREMENT;
      }
    }
  }

  void increaseSizeOfSelectedBoxes() {
    for (Box box in boxes) {
      if (box.isSelected()) {
        box.height = box.height + Box.DEFAULT_INCREMENT;
        box.width = box.width + Box.DEFAULT_INCREMENT;
      }
    }
  }

  void decreaseSizeOfSelectedBoxes() {
    for (Box box in boxes) {
      if (box.isSelected()) {
        box.height = box.height - Box.DEFAULT_INCREMENT;
        box.width = box.width - Box.DEFAULT_INCREMENT;
      }
    }
  }
The incremental change in the size of boxes is defined by the constant in the Box class.
Code 08-09.04: The box size change constant.
class Box {
  …
  static const int DEFAULT_INCREMENT = 20;
The button elements with their corresponding ids are added to the View menu of the Web page.
Code 08-09.05: Menu item buttons in HTML.
<li>View
         <ul>
           <li>
             <button id="increase-selection-height">
               + Selection height
             </button>
           </li>
           <li>
             <button id="decrease-selection-height">
               - Selection height
             </button>
           </li>
           <li>
             <button id="increase-selection-width">
               + Selection width
             </button>
           </li>
           <li>
             <button id="decrease-selection-width">
               - Selection width
             </button>
           </li>
           <li><button id="increase-selection-size">
             + Selection size
           </button>
           </li>
           <li>
             <button id="decrease-selection-size">
               - Selection size
             </button>
           </li>
The Figure 08-09.03 shows three boxes with different sizes.
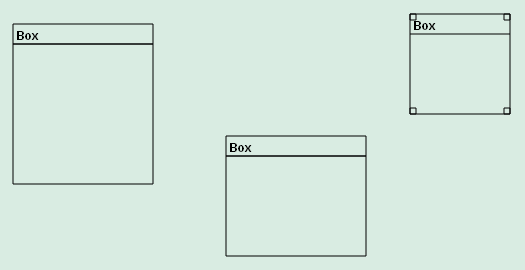
Figure 08-09.03: Boxes with different sizes.
There is a small change in the Board class to introduce the canvas attribute and its initialization by the constructor parameter with the same name.
Code 08-09.06: The canvas attribute.
class Board {
  …
  CanvasElement canvas;
  …
  Board(this.canvas) {
The most recently selected line is kept in the corresponding attribute of the Board class.
Code 08-09.07: Last line selected attribute.
class Board {
  …
  Line lastLineSelected;
There are new attributes in the Line class for direction names and ids.
Code 08-09.08: Line direction names and ids.
class Line {
  …
  String box1box2Name; // name from box1 to box2
  String box1box2Min; // min cardinality from box1 to box2
  String box1box2Max; // max cardinality from box1 to box2
  bool box1box2Id; // id from box1 to box2

  String box2box1Name; // name from box2 to box1
  String box2box1Min; // min cardinality from box2 to box1
  String box2box1Max; // max cardinality from box2 to box1
  bool box2box1Id; // id from box2 to box1
The new attributes are initialized in the constructor.
Code 08-09.09: Default values for the line directions.
Line(this.board, this.box1, this.box2) {
    defaultLineWidth = board.context.lineWidth;
    box1box2Name = '';
    box1box2Min = '0';
    box1box2Max = 'N';
    box1box2Id = false;
    box2box1Name = '';
    box2box1Min = '1';
    box2box1Max = '1';
    box2box1Id = false;
    draw();
  }
In addition to min..max cardinalities, the line direction names and ids are displayed by the draw method of the Line class.
Code 08-09.10: Drawing line directions.
void draw() {
    if (!isHidden()) {
      board.context.beginPath();
      board.context.moveTo(box1.x + box1.width / 2, box1.y + box1.height / 2);
      board.context.lineTo(box2.x + box2.width / 2, box2.y + box2.height / 2);
      if (isSelected()) {
        board.context.lineWidth = defaultLineWidth + 2;
      } else {
        board.context.lineWidth = defaultLineWidth;
      }
      Point box1box2MinMaxPoint =
        calculateMinMaxPointCloseToBeginBox(box1, box2);
      Point box2box1MinMaxPoint =
        calculateMinMaxPointCloseToBeginBox(box2, box1);
      Point box1box2NamePoint = calculateNamePointCloseToBeginBox(box1, box2);
      Point box2box1NamePoint = calculateNamePointCloseToBeginBox(box2, box1);
      String box1box2MinMax = '${box1box2Min}..${box1box2Max}';
      String box2box1MinMax = '${box2box1Min}..${box2box1Max}';
      if (box1box2Id) {
        board.context.font = 'bold italic ${textFontSize}px sans-serif';
      } else if (box1box2Min != '0') {
        board.context.font = 'bold ${textFontSize}px sans-serif';
      } else {
        board.context.font = '${textFontSize}px sans-serif';
      }
      board.context.fillText(box1box2MinMax, box1box2MinMaxPoint.x,
        box1box2MinMaxPoint.y);
      board.context.fillText(box1box2Name, box1box2NamePoint.x,
        box1box2NamePoint.y);
      if (box2box1Id) {
        board.context.font = 'bold italic ${textFontSize}px sans-serif';
      } else if (box2box1Min != '0') {
        board.context.font = 'bold ${textFontSize}px sans-serif';
      } else {
        board.context.font = '${textFontSize}px sans-serif';
      }
      board.context.fillText(box2box1MinMax, box2box1MinMaxPoint.x,
        box2box1MinMaxPoint.y);
      board.context.fillText(box2box1Name, box2box1NamePoint.x,
        box2box1NamePoint.y);
      board.context.closePath();
      board.context.stroke();
    }
  }
The selection methods of the Line class handle the lastLineSelected attribute of the Board class.
Code 08-09.11: The last line selected.
void select() {
    _selected = true;
    board.lastLineSelected = this;
  }

  void deselect() {
    _selected = false;
    board.lastLineSelected = null;
  }

  void toggleSelection() {
    _selected = !_selected;
    if (_selected) {
      board.lastLineSelected = this;
    } else {
      board.lastLineSelected = null;
    }
  }
A line direction name is placed close to its line and the begin box. This location is determined by the calculateNamePointCloseToBeginBox method of the Line class.
Code 08-09.12: Location for a line direction name.
Point calculateNamePointCloseToBeginBox(Box beginBox, Box endBox) {
    num x = 0;
    num y = 0;

    Point lineBeginPoint = beginBox.center();
    Point lineEndPoint = endBox.center();
    Point beginPoint = beginBox.getIntersectionPoint(lineBeginPoint, lineEndPoint);
    Point endPoint = endBox.getIntersectionPoint(lineEndPoint, lineBeginPoint);

    num x1 = beginPoint.x;
    num y1 = beginPoint.y;
    num x2 = endPoint.x;
    num y2 = endPoint.y;

    if (x1 <= x2) {
      x = x1 + 3 * ((x2 - x1) / 8);
      if (y1 <= y2) {
          y = y1 + 3 * ((y2 - y1) / 8);
      } else {
          y = y2 + 5 * ((y1 - y2) / 8);
      }
    } else {
      x = x2 + 5 * ((x1 - x2) / 8);
      if (y1 <= y2) {
          y = y1 + 3 * ((y2 - y1) / 8);
      } else {
          y = y2 + 5 * ((y1 - y2) / 8);
      }
    }
    return new Point(x, y);
  }
The line direction elements are declared as attributes in the ToolBar class.
Code 08-09.13: Line direction elements as attributes.
class ToolBar {
  …
  LabelElement line12Box1Label;
  LabelElement line12Box2Label;
  InputElement line12MinInput;
  InputElement line12MaxInput;
  InputElement line12IdCheckbox;
  InputElement line12NameInput;

  LabelElement line21Box2Label;
  LabelElement line21Box1Label;
  InputElement line21MinInput;
  InputElement line21MaxInput;
  InputElement line21IdCheckbox;
  InputElement line21NameInput;

  ButtonElement getLineButton;
  ButtonElement setLineButton;
The line direction attributes are initialized in the constructor of the ToolBar class.
Code 08-09.14: Initialization of the line direction attributes.
line12Box1Label = document.querySelector('#line12Box1');
    line12Box2Label = document.querySelector('#line12Box2');
    line12MinInput = document.querySelector('#line12Min');
    line12MaxInput = document.querySelector('#line12Max');
    line12IdCheckbox = document.querySelector('#line12Id');
    line12NameInput = document.querySelector('#line12Name');

    line21Box2Label = document.querySelector('#line21Box2');
    line21Box1Label = document.querySelector('#line21Box1');
    line21MinInput = document.querySelector('#line21Min');
    line21MaxInput = document.querySelector('#line21Max');
    line21IdCheckbox = document.querySelector('#line21Id');
    line21NameInput = document.querySelector('#line21Name');
The get line button element reacts in the constructor of the ToolBar class to the click event by obtaining the last selected line.
Code 08-09.15: Getting the last selected line.
getLineButton = document.querySelector('#getLine');
    getLineButton.onClick.listen((MouseEvent e) {
      Line line = board.lastLineSelected;
      if (line != null) {
        line12Box1Label.text = line.box1.title;
        line12Box2Label.text = line.box2.title;
        line12MinInput.value = line.box1box2Min;
        line12MaxInput.value = line.box1box2Max;
        line12IdCheckbox.checked = line.box1box2Id;
        line12NameInput.value = line.box1box2Name;

        line21Box2Label.text = line.box2.title;
        line21Box1Label.text = line.box1.title;
        line21MinInput.value = line.box2box1Min;
        line21MaxInput.value = line.box2box1Max;
        line21IdCheckbox.checked = line.box2box1Id;
        line21NameInput.value = line.box2box1Name;
      }
    });
The set line button element reacts in the constructor of the ToolBar class to the click event by accepting changes of the last selected line.
Code 08-09.16: Accepting changes of the last selected line.
setLineButton = document.querySelector('#setLine');
    setLineButton.onClick.listen((MouseEvent e) {
      Line line = board.lastLineSelected;
      if (line != null) {
        line.box1box2Min = line12MinInput.value.trim();
        line.box1box2Max = line12MaxInput.value.trim();
        if (line.box1box2Min == '1' && line.box1box2Max == '1') {
          line.box1box2Id = line12IdCheckbox.checked;
        } else {
          line12IdCheckbox.checked = false;
          line.box1box2Id = false;
        }
        line.box1box2Name = line12NameInput.value.trim();

        line.box2box1Min = line21MinInput.value.trim();
        line.box2box1Max = line21MaxInput.value.trim();
        if (line.box2box1Min == '1' && line.box2box1Max == '1') {
          line.box2box1Id = line21IdCheckbox.checked;
        } else {
          line21IdCheckbox.checked = false;
          line.box2box1Id = false;
        }
        line.box2box1Name = line21NameInput.value.trim();
      }
    });
  }
The line elements have their HTML representation in the mb.html file.
Code 08-09.17: Tool bar section with line elements.
<section>
<canvas id="canvas" width="990" height="560">
Canvas is not supported in your browser.
</canvas>
<footer>
<button id="select"><img src="img/select.png"/></button>
<button id="box"><img src="img/box.png"/></button>
<button id="line"><img src="img/line.png"/></button>
<label for="boxName">Box</label>
<input type="text" id="boxName"/>
<label for="itemName">Item</label>
<input type="text" id="itemName"/>
<select id="itemCategory">
<option>attribute</option>
<option>guid</option>
<option>identifier</option>
<option>required</option>
</select>
<button id="addItem">Add</button>
<button id="getItem">Get</button>
<button id="setItem">Set</button>
<button id="removeItem">Remove</button>
<br/><br/>
<label id="line12Box1">Box1</label> ->
<label id="line12Box2">Box2</label>
<input type="text" id="line12Min" size="1"/> ..
<input type="text" id="line12Max" size="1"/>
<label for="line12Id">Id</label>
<input type="checkbox" id="line12Id"/>
<label for="line12Name">Name</label>
<input type="text" id="line12Name"/> |
<button id="getLine">Get</button>
<br/>
<label id="line21Box2">Box2</label> ->
<label id="line21Box1">Box1</label>
<input type="text" id="line21Min" size="1"/> ..
<input type="text" id="line21Max" size="1"/>
<label for="line21Id">Id</label>
<input type="checkbox" id="line21Id"/>
<label for="line21Name">Name</label>
<input type="text" id="line21Name"/> |
<button id="setLine">Set</button>
</footer>
<script type="application/dart" src="mb.dart"></script>
<script src="packages/browser/dart.js"></script>
</section>In the page.css file, the width property of the body selector is updated to 1000 pixels.
Code 08-09.18: Width of 1000 pixels.
body {
    font-family: verdana, arial, helvetica, sans-serif;
    font-size: 16px;
    background: #d9ece2;
    width: 1000px;
    margin-left: auto;
    margin-right: auto;
    padding:10px;
  }
The new width provides a better display of the tool bar in Figure 08-09.04. The figure shows the Order Items model.
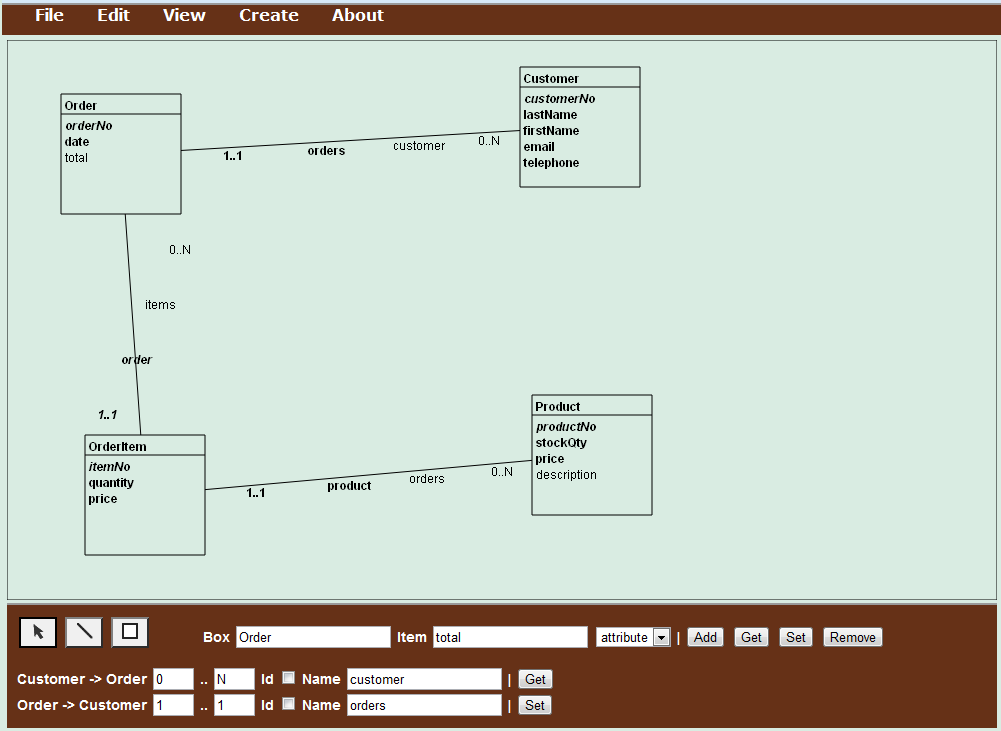
Figure 08-09.04: Order items model.
In the Board class, the saveAsPng method finds the model image element in the document and converts the canvas object to the PNG image.
Code 08-09.19: Saving a model as a png image element.
void saveAsPng() {
    ImageElement modelImage = document.querySelector('#modelImage');
    modelImage.src = canvas.toDataUrl("image/png");
  }
The image object is represented in HTML as the img element. The modelImage id is used to connect the image object in Dart with the image element in HTML.
Code 08-09.20: Model displayed as an image in the Your Model section of the Web page.
<section>
      <header>
        <h3>Your Model</h3>
      </header>
      <p>
        In the File menu, save your model as a .png image:
      </p>
      <img alt="Your model saved as .png." id="modelImage"/>
      <p>
        You may save the model image as the model.png file in the mb/img directory.
      </p>
    </section>
The button element attribute is used in the MenuBar class to provide a way for a user to save a model as a PNG image.
Code 08-09.21: File menu item as the button element attribute.
class MenuBar {
  …
  // File
  ButtonElement saveAsPngButton;
The button element attribute is initialized in the constructor of the MenuBar class.
Code 08-09.22: Initializing the save as button.
MenuBar(this.board) {
    saveAsPngButton = document.querySelector('#save-as-png');
After the initialization of the button element attribute, the click event is defined.
Code 08-09.23: Reacting to the button click.
saveAsPngButton.onClick.listen((MouseEvent e) {
      board.saveAsPng();
    });
A model may be saved as an image file by using the File menu. The model appears first within the Web page (Figure 08-09.05) where it can be saved by using the right button of the mouse.
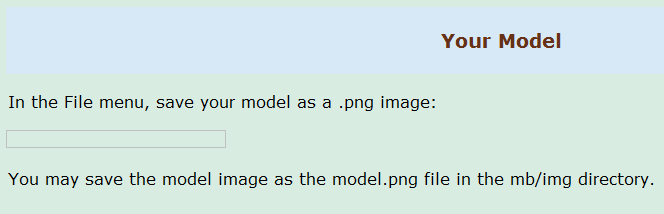
Figure 08-09.05: Place where a model will appear after the save.
In the mb.html file, the button element is added as the File menu item.
Code 08-09.24: File menu item.
<li>File
         <ul>
           <li>
             <button id="save-as-png">
               Save as .png
             </button>
           </li>
         </ul>
       </li>
There is also the About menu that is defined only in HTML. The About menu was introduced in one of the earlier spirals.
Code 08-09.25: About menu.
<li>About
         <ul>
           <li>Magic Boxes in <a href="http://www.dart.org/">Dart</a></li>
           <li>Spiral 09</li>
           <li>2012-01-02</li>
           <li>Dzenan Ridjanovic</li>
           <li><img src="img/ondart0.png"/></li>
         </ul>
       </li>
There are changes related to box items in the ToolBar class that should have been reported earlier. After an item of the last selected box is obtained based on its entered name, a value of the item option element is updated to a category of the item.
Code 08-09.26: Getting the item.
getItemButton = document.querySelector('#getItem');
    getItemButton.onClick.listen((MouseEvent e) {
      Box box = board.lastBoxSelected;
      if (box != null) {
        Item item = box.findItem(itemNameInput.value);
        if (item != null) {
          currentItem = item;
          itemNameInput.value = item.name;
          itemOption.value = item.category;
          itemNameInput.select();
        } else {
          currentItem = null;
        }
      }
    });
After changing the item of the last selected box, the category of the current item is updated.
Code 08-09.27: Setting the item.
setItemButton = document.querySelector('#setItem');
    setItemButton.onClick.listen((MouseEvent e) {
      Box box = board.lastBoxSelected;
      if (box != null) {
        if (currentItem != null) {
          currentItem.name = itemNameInput.value;
          currentItem.category = itemOption.value;
          itemNameInput.select();
        }
      }
    });
After removing the item of the last selected box, the value of the item option comes back to the attribute default value.
Code 08-09.28: Removing the item.
removeItemButton = document.querySelector('#removeItem');
    removeItemButton.onClick.listen((MouseEvent e) {
      Box box = board.lastBoxSelected;
      if (box != null) {
        if (currentItem != null) {
          if (box.removeItem(currentItem)) {
            currentItem = null;
            itemNameInput.value = '';
            itemOption.value = 'attribute';
          }
        }
      }
    });